Wednesday, December 25, 2013

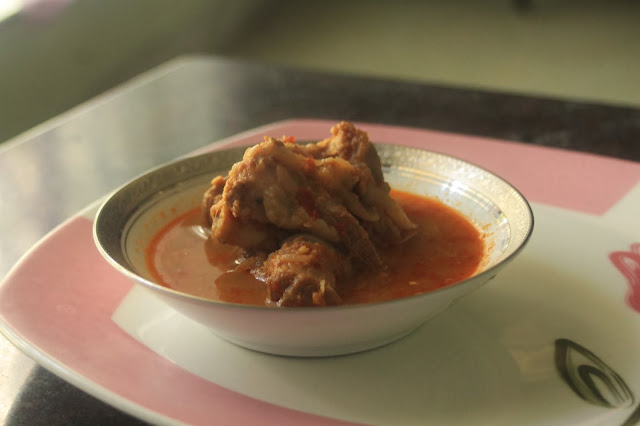
Laal Maas


Laal Maas is a Rajasthani curry that gets its wonderfully rich red colour from broiled onions, ginger and garlic, and a ground red chill paste. There are variants that use tomatoes to thicken the gravy and heady spices like cinnamon, cardamom and star anise, but that isn't true to the recipe. Rajasthani Laal Maas is made with a handful of cloves, and relies on the slow broiling of the onions, ginger and garlic in oil to a burnished red paste for that wonderful caramel flavour. This preparation also uses a thick red chilli paste, made with mathania chilies, which are a rich red colour but lack the bite of a chilli. To substitute, kashmiri red chillies can be used, or a combination of dried red chilies and kashimi red chillies, depending on your spice tolerance. The meat used is mutton, as it stands up to the slow broiling needed and has a flavour that lamb sorely lacks.


Ingredients

  • 500 g mutton, cut into bite sized pieces
  • 4 tbsp ginger garlic paste
  • 1 large onion, sliced lengthwise
  • 10 cloves
  • 1 1/2 cup whisked curd
  • 8 mathania red chillies, ground into a thick paste
  • 1 1/2 cup water
  • 2 tbsp mustard oil
  • 1 small piece of charcoal
  • 1 tbsp salt
Method
  1. Heat 1 tbsp of the oil in thick bottomed pan, until its hot but not smoking. Add the cloves and let them crackle. Then add the onions and cook until it turns translucent.
  2. Add the ginger-garlic paste and stir vigourously to prevent it from sticking. Lower the heat and slow broil it till the onions and ginger-garlic paste caramelise and turn a burnished red colour.
  3. Add the mathania chilli paste and continue cooking on low heat until it melds into the paste. 
  4. Add the mutton pieces and toss around to make sure the paste evenly coats the pieces. Continue slow broiling and brown the mutton pieces.
  5. Add the curd and salt, and mix around. Add the water and bring to a boil.
  6. Transfer to a pressure cooker and cook on high heat till the pressure builds. Once the pressure builds, lower the heat and cook for 20 minutes, until the meat is tender and falls off the bone.
  7. Heat and activate the charcoal, then transfer it into a shallow bowl.
  8. Place the charcoal bowl in the middle of the curry and pour the remaining mustard oil over the charcoal.
  9. Once it starts smoking, cover the gravy with a tight fitting lid. Let the gravy absolve the smoke for a at least 20 minutes. Then remove the lid and bowl and serve hot with plain rotis or rice.

Sunday, December 15, 2013

Pan Seared Fish with Lemon Caper Sauce


The local store today have this wonderfully vibrant parrot fish, with its glistening blue skin and thick meaty steaks. I've only ever seen this bounding in and out of coral reefs on Discovery, so was curious about how it would taste. Like other reef fishes, like the Dotted Cod, it is a firm white fish but with a much deeper flavour. It also helps that this fish is neither commercially exploited nor farmed, so its flavour matures naturally. Since I was trying it for the first time, I decided to season it sparingly, and just pan-searing it, then deglazing the pan to create a lemon caper sauce. As the fish was a mature 2 footer, the thick skin-on that I got out of it had few bones, that a simple tug dislodged. Along with the fish, I served plain rice to mop up the sauce. 

Also, for that yummy crispy skin, I used a non-stick steel pan and a rice bran oil, to get the temperature up to high. Any other oil with a high smoke point can be used, like canola or refined safflower. 

Ingredients

Fish

  • 2 skin-on parrot fish filets, or any other white fish.
  • 2 tsp salt
  • 2 tsp pepper
  • 2 tbsp rice bran oil
  • 2 tbsp butter
Lemon Caper sauce
  • Juice of half a lime
  • 8-10 pickled capers, whole
  • 1 tbsp butter
  • 1/2 cup white wine
  • 2 cloves garlic, chopped
  • 1 tsp pepper
  • 2 cilantro stalks, chopped
  • Rice to serve
Method
  1. Salt the fish filets liberally on both sides, and rub the salt into the flesh. If you're using thick steaks there's no need to score the skin, but for thin filets, lightly score the skin. Sprinkle the pepper on the flesh side.
  2. Leave aside for 10 minutes at room temperature. 
  3. Heat the oil in a steel pan on high heat. If the oil starts smoking, take it off the heat and let it cool slightly. Then put it back on high heat and immediately add the fish filets skin side down. Jiggle the pan when the fish hits the oil to dislodge it slightly, as it keeps it from sticking. Cook uncovered on high heat for a minute, and don't move the fish around. 
  4. Add the butter and lower the heat to mid-high for a thin filet and medium for a thick filet (thicker than an inch).
  5. Melt the butter and pour over the fish. Keep basting it till the butter soaks into the fish.
  6. Cook covered for a minute, until the fish is cooked 2/3 of the way. Using a sharp firm spatula, drive it under the fish and gently flip it over. A bit of the skin may stick, but most of it should come away easily.
  7. Baste again with the cooking liquour and cook on medium-high or medium (on the basis of filet thickness) until the fish is completely cooked.
  8. Place on a plate with the skin-side up to show off the golden brown skin.
  9. Raise the heat and cdd the garlic and capers to the butter-oil mixture in the pan. Crispen the garlic and capers slightly and deglaze with the wine. Stir vigourously to dislodge the bits stuck to the pan and cook until the wine reduces to half.
  10. Add the remaining butter to the pan and melt it to create an thin emulsion. Take off the heat and add the lemon juice, pepper and cilantro. Avoid cooking the lemon juice as it makes it bitter.
  11. Pour over the fish and serve immediately with rice. Fish with its delicate texture does really need any resting time.


Friday, December 13, 2013

Mediterranean Tuna Steaks


The sizzle of meat hitting a hot grill has this wonderful therapeutic effect that wakes you up to the weekend. Grilling's especially great with a fish like tuna, with light seasonings and herbs to complement the rich flavour or dense texture of the fish. I've made a mediterranean inspired tuna chermoula with sumac and cilantro. The sumac can be replaced with fresh lime juice, but juice the fish after the cooking's done, as lemon juice gets quite bitter when heated. I also used a grill pan for the fish, so this can quite easily made indoors, but a charcoal grill would be ideal for the fish. Also, it should be served with something that can soak up the juices of the grill, like rice or pita.


Ingredients

  • 200 g tuna filet, cut into bite sized pieces
  • 1 tbsp sumac
  • 2 tbsp olive oil
  • 1 tsp salt
  • 1 tsp pepper
  • 2 cloves garlic, minced
  • 1 tsp dried rosemary
  • 1tsp dried oregano
  • 1 tbsp red wine vinegar
  • 2 stalks of cilantro, chopped
  • 1 capsicum, cut into square
  • 1 tomato, quartered
  • 1 cup cooked rice and lemon wedges to serve

Method

  1. Mix the olive oil, vinegar, rosemary, oregano, garlic, cilantro, pepper, salt and sumac together to create a thick chermoula. Baste liberally over the tuna pieces and leave aside for an hour to marinate.
  2. Clean and oil two skewers and oil a grill pan. Thread the tuna pieces, capsicum and tomato pieces in sequence on the skewer. Baste the skewered meat with the remaining chermoula.
  3. Heat the grill pan on high heat and place the skewers on the pan.
  4. Cook once on both sides and then lower the heat to medium. Cook it evenly on all four sides.
  5. Remove the pan from the heat, add the remaining chermoula and rice. Toss the rice around and create a bed of the rice on a plate. Loosen the meat and serve up on the skewer with lemon wedges.

Saturday, November 23, 2013

Tuna Tagine with Fresh Capellini


I found this wonderful store here that stores mediterranean spices and preserves, like sumac and preserved lemons; I jumped at the bottle of preserved limes, simply for that wonderfully tart flavour that it brings to stews. Tuna season's also back, and since I'm presently obsessing over fresh pasta, I decided to bring all of it together with a tuna tagine served over fresh capellini. The capellini recipe can be found here, and use the finest white flour available, else the capellini wouldn't hold its form when thinned down.

This tagine is a simple enough dish, with a thick tomato base and light lemony tones brought in by the sumac and preserved limes. Also keep a little sumac aside for dusting. I've used tuna for the tagine, but any firm white fish can be used. However, if you're using a mild flavoured white fish, marinate it in the chermoula over-night. With tuna, as it is a strong flavoured fish, around 2 hours in the chermoula should suffice, as it would lightly complement the flavour of the tuna.


Ingredients

Fish and Chermoula

  • 400 g fresh tuna filet, cut into bite sized pieces
  • 1 small bunch parsley, roughly chopped
  • 3 stalks coriander, roughly chopped
  • 4 cloves garlic, chopped
  • 2 tbsp olive oil
  • 1 tsp salt
  • 2 tsp paprika
  • 1 tsp chili flakes
  • 1 tbsp water
Tagine
  • 1 medium onion
  • 3 tomatoes, chopped


Pesto Rosso with Fettuccine


Pesto Rosso, or red pesto, is this wonderfully sweet and lightly acidic paste that's makes a great pasta sauce, or spread over warm toast. It gets its deep red colour from the sun-dried tomatoes. Traditionally its made by pounding everything together in a mortar and pestle, but its so much simpler to blitz it in food processor. The pestle method also creates grainer pesto, while I prefer mine to be smoother. For the sun-dried tomatoes, if you're short on time or patience, or are in a place like Bangalore where the sun hides lazes underneath a blanket of clouds, you can just dry tomatoes out in an oven. I dried them out on gas mark 3 for around 3-4 hours; a kilo of tomatoes makes around a cup of dried tomatoes. To serve with pasta, use 2 tbsp of the paste and mix it with a tablespoon of grated parmesan or grana padano, then thin it out with the  a cup full of the pasta cooking liquor. The recipe for fresh fettuccine can be found here. This recipe will make around a cup and half of pesto, and it keeps well in the fridge for around 2 weeks.


Ingredients

  • 1 cup sun dried tomatoes
  • 6 almonds, chopped
  • 1/2 cup olive oil
  • 1 tbsp black olives
  • 4 cloves garlic
  • 1 tsp dried rosemary
  • 1 tsp salt
  • 1 tsp pepper
  • 2 tsp paprika
Method
  1. Toast the chopped almonds on high heat, until they release their aroma. Keep shaking the pan to prevent the almonds from burning.
  2. Add the chopped almonds, sun-dried tomatoes, olives, garlic, rosemary, salt and pepper to a grinder, and mince it until its evenly chopped.
  3. Add half the olive oil and blitz to create a thick paste. Add the remaining olive oil for a thinner paste.
  4. Store in the fridge in a dry air tight jar.
  5. For a richer paste, mix in around 2 tbsp of parmesan or grana padano.


Monday, November 4, 2013

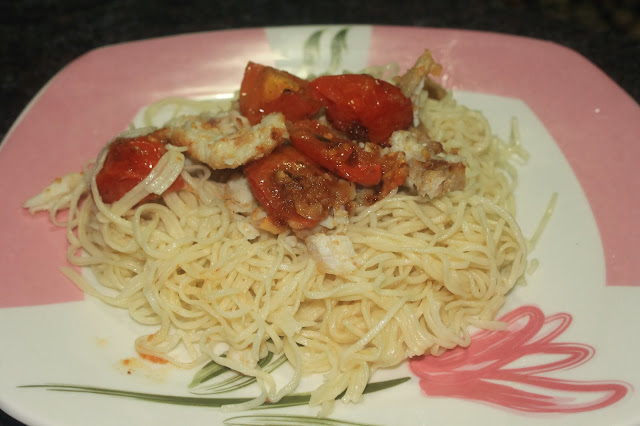
Capellini with Sea Bass


Strings of thin capellini are great with roasts, as they mop up the juices of the roasting vegetables and meat. These little shoestrings should be made with finely ground flour, as the high gluten content of flour helps hold it together. This dish is a simple salad of crusted sea-bass with roast tomatoes, over a bed of capellini. The capellini can just as simply be substituted with any thin pasta, like macaroni or farfale, as its purpose to simply soak up the flavour of the fish and the tomato. 


Ingredients

Capellini

  • 2 cups fine white flour
  • 2 eggs
  • 1 tsp salt
Roast
  • 500g skinless sea bass cubes, preferably with bones
  • 2 tbsp butter
  • 4 tbsp olive oil
  • 6 cloves garlic, chopped
  • 1 tsp chili flakes
  • 3 tbsp breadcrumbs
  • 1 small bunch coriander, chopped
  • 4 small tomatoes, cubed
  • 1 tsp salt
  • 1 tsp pepper
  • 1 lemon
Method

Capellini

  1. Mix the flour, salt and eggs together to create a stiff dough. Add a little water it needed, and then wrap it in cling film and keep it aside for 30 minutes.
  2. Cut into quarters, and gradually roll out one quarter on a pasta-machine, flouring at each roll to keep it from sticking. Thin it down to the 8th setting, just one off the thinnest setting.
  3. Run through the capellini cutter and boil immediately in salted water. 
  4. Boil for 10-12 seconds, and keep aside with a little oil to keep it from sticking.
Roast
  1. Melt the butter with the olive oil, and add it to the breadcrumbs, chill flakes, garlic and coriander. Beat together create a thick paste.
  2. Heat an oven to 240C/gas mark 8.
  3. Clean the fish and salt it with a pinch. Keep aside for ten minutes.
  4. Add the fish to a  roasting tin and pour on the bread-crumbs paste. Toss around to make sure that it coats the fish.
  5. Toss in the tomatoes and roast in the oven for 12-15 minutes, until the fish is cooked through.
  6. Once cooked, flake the fish and remove the bones. 
  7. Toss the capellini in the roasting pan and create a little bed. Add the tomatoes and flaked fish on top and juice a lemon before serving.

Saturday, October 26, 2013

Grilled Quail with Couscous


My local supermarket's started keeping quail, and it felt like a good day to try something a little more gamey. Quail's an interesting meat, and is quite lean. It like chicken, but a lot softer in texture and with a slightly sweeter taste. It's especially popular around Ramzan, where its lathered in a thick ginger-onion marinade and deep fried whole. In this recipe, I've grilled the quail with sumac, rosemary and thyme and served it with a fruity couscous and a light vinaigrette. To help with the grilling, I had the quails halved and spread out, but you can get them spatchcocked/butterflied as well.

Ingredients

Quail

  • 2 quails, halved and 
  • 1 tsp dried thyme
  • 1 tsp sumac
  • 1 tsp dried rosemary
  • 2 tbsp olive oil
  • 1 tsp salt
  • 1 tsp pepper
Couscous
  • 1/2 cup instant couscous
  • 1/2 cup boiling water
  • 1 tsp salt
  • 3 walnuts, chopped
  • 3 almonds, chopped
  • 6 raisins, chopped
  • 1 tbsp chopped mint
Vinaigrette
  • 1/2 purple onion, finely diced
  • 1 tbsp mint, chopped
  • 1 tsp salt
  • 1 tsp paprika
  • 1 tbsp olive oil
  • 1 tbsp sherry vinegar
  • 1 tsp pepper
Method
  1. Mix the quail ingredients together to create a marinade, add it to the quail pieces, and leave aside to marinate for at least 2 hour, and preferably overnight.
  2. For the couscous, add dissolve the salt in the water, mix the other couscous ingredients together and add the salted boiling water. Cover and leave aside for 7-8 minutes.
  3. Mix the vinaigrette ingredients together and store in the fridge until use.
  4. Once ready to grill, heat a grill pan or a barbecue on medium, and baste the grooves with oil.
  5. Once heated, pour the marinade over the quail one last time, then place each piece on the grill.
  6. Cook on each side for 4 minutes, until the quail pieces are cooked through. Take off the grill and let it rest for 2-3 minutes.
  7. To assemble, make a bed of the couscous and place two halves of the quail on top. Pour the vinaigrette over and serve up.

Saturday, October 19, 2013

Fresh Fettuccine with Pesto


A wonderful medley of flavours and textures, with such a simple preparation. Classic pesto may work your muscles, but now with the whizz of a blender, it can be whipped up in a matter of minutes. Pesto is best served fresh with either pasta, as a dip or topped over bread. It balances the peppery flavour of basil with the wonderful sweetness of nuts, has the sharp bite of aged cheese. In this recipe, I've used walnuts in place of pine nuts, and grana padano, and served it up with fresh fettuccine, the recipe of which can be found here. I made this fettuccine with just fine plain white flour, and without semolina, as I wanted a softer texture.


Ingredients

  • 2 tbsp chopped walnuts/pine-nuts
  • 3 tbsp olive oil
  • 1 bunch (60g) fresh basil, chopped
  • 4 cloves garlic, chopped
  • 1 tsp salt
  • 1 tsp pepper
  • 3 tbsp grated grana padano
Method
  1. Pound the garlic and walnuts/pine-nuts, with the salt and pepper, in a pestle, to a smooth paste.
  2. Add the chopped basil and water to a food processor/blender, and blitz to a thick paste.
  3. Add the garlic-nut paste and run again, to mix it evenly through the paste.
  4. Add the oil and turn into an emulsion. If the paste is too thick, add a little water to get the desired thickness.
  5. Remove the mixture from the food processor and into a large mixing bowl. Add the cheese and stir it into the paste. Avoid using the a food  processor or blender for this bit, as the grated cheese would lose its distinctive sharpness and texture.
  6. Check the salt, and serve with pasta, on top of pizzas or as a dip.
  7. If using with pasta, fry the pesto lightly in oil and add the pasta water to thin it out, before mixing with the pasta.

Monday, October 14, 2013

Panini


Have it for breakfast or lunch, its a satisfyingly filling sandwich, with a crisp top and an oozing centre. I made these as I had a little pepperoni and pizza sauce leftover, and a new grill pan to play with. A panini can be made in a panini press, or using a grill pan and a heavy weight. I made the bread, but the panini can be made with any other bread, like a foccacia, baguette or a sliced bread. 


Ingredients

Bread

  • 2 cups wholewheat flour
  • 1 tsp dried yeast
  • 1/2 cup warm water
  • 2 tbsp oil
  • 1 tsp salt
Filling
  • 12 pepperoni slices
  • 3 tbsp cheese (a mix of mozzarella and cheddar)
  • 12-14 sliced olives
  • 1 tomato, sliced
  • handful of basil leaves
  • 2 tbsp thick marinara or pizza sauce
Method

Bread
  1. Dissolve the yeast in warm water and leave aside to turn frothy.
  2. Once activated, add to the whole-wheat flour, oil and salt and made a smooth dough.
  3. Leave aside in a warm place to proof.
  4. Once doubled, punch down and shape into to long cylinders. Flatten each each cylinder slightly, transfer to a floured baking sheet and leave side in a warm place for a second proofing.
  5. Once the dough rises for a second time, place in a pre-heated oven, at 180C/gas mark 6 for 20 minutes.
Panini
  1. Heat a well-oiled grill pan on high heat and add the tomato slices. Grill on high heat on both sides.
  2. Slice the bread lengthwise and spread half the sauce on the lower half of the bread. Add half the pepperoni, grilled tomato slices, olives, basil and cheese.
  3. Place the top half of the bread back on, baste the top with olive oil and place on a well-oiled grill on medium heat. Place a heavy weight on top and grill it for around 5-7 minutes on both sides.

Risotto ai Funghi


As I've said before, when you're making risotto, use the rice that you like to eat. I've used rose matta rice for this risotto, and while it doesn't have the same starch content as arborio, still makes a nice nutty and earthy risotto. Also, with risotto, be generous with the butter, you can run it off later, but to really make a delectable plate of risotto, you can't skimp on the butter. Lastly, to add a richness to the risotto, it needs a little cheese to just lift it up. Typically the cheese used is a mature parmesan or grana pandano, but both are quite sour and salty cheeses, and I'm not a fan of such mature cheeses. Thus, I've used processed cheddar instead as it adds that slight sweetness to the risotto.


Ingredients

  • 1 cup rose matta rice, washed and cleaned
  • 4 mushrooms, thinly sliced
  • 1/2 cup dry white wine
  • 1 tsp chili flakes
  • 1 bay leaf
  • 1 tsp dried oregano leaves
  • 3 cloves garlic, thinly sliced
  • 6-7 slices of black olives
  • 3 tbsp butter
  • 1 tbsp oil
  • 3 cups vegetable stock
  • 1 tsp salt
  • 1 tsp pepper
  • 1 tbsp granted processed cheese
Method
  1. Heat the stock and bayleaf till boiling, and then take off the heat.
  2. Heat 2 tbsp of butter and oil in a pan. Once foaming, add the garlic and fry till it starts to turn brown.
  3. Add the mushrooms and oregano. Cook on medium heat until the oil starts to separate.
  4. Add the rice and stir around till the oil coats each grain.
  5. Cook for a minute, until the rice turns a little opaque.
  6. Add the olives and wine and stir around vigourously to evenly distribute the wine. Cook covered until the wine is absorbed.
  7. Reduce the heat to low, and add a ladle full of the warm stock and the bayleaf. Stir around and cook covered until the stock is absorbed.
  8. Continue adding a single ladle-full and cooking until absorbed, until one ladleful remains.
  9. Add the last ladle of stock, salt, pepper, remaining butter and cheese. Stir vigorously and cover. Cook until the cheese has melted into the sauce, and a thin sauce remains.
  10. Check the rice, it should be chewy in the centre.
  11. Remove from the heat and let it stand, covered, for 5-10 minutes. Then remove the bay-leaf and serve up immediately.

Naengmyeon


Fresh buckwheat noodles with a spicy sauce and picked radish, this cold salad has an interest mix of flavours and textures, from the bitterness of the buckwheat to the tartness of the pickled radish. This cold salad is a korean creation and is meant to be had in summer, and packs a mean punch in terms of heat. I came across this recipe at beyondkimchee.com, and changed it around slightly to fit the ingredients at home. The recipe for the buckwheat noodles is from thekitchn.com, which is a great site with helpful instructions for making pasta and noodles.


Ingredients

Buckwheat Noodles

  • 2 cups buckwheat flour (called 'Kuttu atta' in India)
  • 1/2 cup plain white flour
  • water to make a dough
  • 1 tsp salt
Pickled Radish
  • 1 radish, peeled and cut into thin and broad slices
  • 1 tsp salt
  • 2 tbsp white vinegar
  • 1 tbsp sugar
Sauce
  • 1/4 cup soy sauce
  • 1/2 cup water
  • 1/2 apple, peeled and roughly diced
  • 2 ripe star fruit or 4 thick slices of pineapple, roughly diced
  • 8-10 dried red chilies, de-seeded and chopped
  • 1 small onion, finely chopped
  • 2 cloves garlic, roughly chopped
  • 4 tbsp white vinegar
  • 3 tbsp crushed jaggery or brown sugar
  • 2 tbsp honey
  • 1 tbsp sesame oil
  • 1 tsp ginger powder
  • 1 tbsp mustard
  • 1 tsp salt
  • 2 tbsp toasted sesame seeds
Garish
  • 1 cucumber, deseeded and cut into thick semi-circular slices
Method

Buckwheat Noodles
  1. Make a smooth dough with the buckwheat flour, plain flour and salt. Roll it out on a  pasta maker or with a rolling pin into thin sheets. 
  2. Cut into noodles and boil in salted water for a few seconds, until cooked. I cut them out into flat noodles as they were easier to handle.
  3. Once cooked take out of the boiling water and rinse in cold water. Then store in the fridge until its time to assemble the salad.
Pickled Radish
  1. Dissolve the salt and sugar in the vinegar and pour onto the radish slices.
  2. Toss around and leave aside in the fridge for at least 1 hour.
Sauce
  1. Heat the water and soy together until it starts to boil. Then take it off the heat and leave aside to cool.
  2. Combine the apple, onion, star fruit, garlic and chopped chili in a food processor, add 2 tbsp of water and blend together to create a thick paste.
  3. Add the paste to the soy-water mixture, and toss in the vinegar, jagger, honey, mustard, ginger powder, salt and sesame oil, mix together and return it to the heat.
  4. Boil on high heat until the sauce develops this silky sheen. Add the sesame seeds and take it off the heat. Mix the sesame seeds through the sauce, and place in the fridge to cool.
Salad
  1. Once all the components are cold, toss the noodles in a plate and pour on some of the sauce. Add some pickled radish and cucumber slices as a garnish.
  2. To keep it cold, keep a plate in the freezer for 10 minutes, and use this for assembling and serving the salad.

Sunday, October 13, 2013

Mushroom Gnocchi


Gnocchi's one of those little fuzzy things that you just can't get enough of. The name is too just so cute that you don't want to stop saying it. Light and fluffy pillow cases that just melt away when you bite into them and they pair perfectly with a lightly flavoured mushroom sauce. The Gnocchi need a bit of muscle in the prep, and so it makes sense to start a little early.

Ingredients

Gnocchi

  • 4 potatoes, whole
  • 1 cup flour
  • 1 egg
  • salt to taste
  • salted water to boil
Mushroom sauce
  • 4-5 button mushroom, thinly sliced
  • 1/2 cup dry white wine
  • 3 cloves garlic, thinly chopped
  • 1 tsp chili flakes
  • 1 tbsp olive oil
  • 1 tsp oregano
  • 1 tsp pepper
Method

Gnocchi
  1. Boil the potatoes in salted water, until cooked through. To test the potatoes, run a knife till the centre; if the knife passes through easily, the potato is cooked, but it it encounters any resistance, keep boiling.
  2. Once boiled, run the potatoes under cold water and peel the skin off.
  3. Mash the potatoes until smooth, and add the egg. Mix around and add half the flour.
  4. Oil your fingers and knead the mix. Keep adding incremental amounts of flour till you get a sticky dough that keeps its form.
  5. Roll out the dough into a thick sausage shape and cut out sections around an inch across.
  6. Heat some salted water and once boiling, add the sections. Boil until they rise up to the surface and remove. 
Sauce
  1. Heat the oil in a pan and add the garlic. Cook until it starts to brown.
  2. Add the mushroom, chili flakes, pepper and oregano, and cook until the oil starts to separate.
  3. Add the wine and cook on a high flame for a minute.
  4. Add a little of the gnoochi cooking liqour to make a sauce.
  5. Let it stew on low heat until it melds together; the starch in the cooking liqour should thicken to create a thick sauce. You can add a little water to thin it down.
  6. Check the salt, and add salt if necessary.
  7. Toss the gnocchi into the sauce, and lightly stir around.
  8. Serve up hot with some bread to mop up the sauce.

Carrot and Parsley Soup


A thick sweet soup, with a lovely silky feel and the bite of celery. This is a simple soup is quick and requires just a handful of ingredients. It also requires very little cooking, and is a great choice for lunch or dinner on lazy days. Also remember to use fresh celery and parsley, as they are the dominant flavours in the soup, and slightly old and wilted celery and parsley have a slightly bitter undertone, that makes the soup unappetizing.


Ingredients

  • 4 carrots, peeled and roughly chopped
  • 2 stalks celery, roughly chopped
  • a small bunch of curly parsley, chopped
  • 3 cups vegetable stock
  • 1 bayleaf
  • 3 cloves garlic, finely chopped
  • 1 tbsp olive oil
  • salt and pepper to taste
Method
  1. Heat the olive oil in a deep bottomed pan and add the garlic.
  2. Fry the garlic until its just cooked, but don't brown it. 
  3. Add the carrots and celery and lower the heat. Sweat out the carrots until they soften.
  4. Add the stock, 3/4ths of the parsley and bayleaf, and cook covered, on low heat, until the carrots are completely cooked through. 
  5. Add the salt and pepper and mix around, then take off the heat, and let it cool.
  6. Once cool enough to blend, remove the bayleaf and add a ladle full to a food processor. 
  7. Blitz until smooth, and keep adding ladles and blending until you get a smooth and thick soup.
  8. Garnish with the remaining parsley and serve up.

Sunday, September 15, 2013

Vermicelli Aglio, Olio e Peperoncino


Fresh pasta in a simple herb dressing is divine. Last time I used the fettuccine attachment in the pasta maker, sot this time I had to play around with the vermicelli attachment. On the first try, I made the pasta sheet a little too thin, and the vermicelli strands ended up sticking together and turning into a lump. So while making vermicelli, thin the pasta sheet to level 5 on the machine, and keep it well floured at each turn. The dressing for a pasta is a simple olive oil infused with garlic, red chilies and parsley.


Ingredients

Pasta

  • 2 cups fine semolina
  • 1 cup whole wheat flour
  • 2 eggs
  • salt to taste
Dressing
  • 2 dried red chilies, thickly sliced
  • 6 cloves garlic, roughly chopped
  • 1 small bunch parsley, chopped
  • 6 tbsp olive oil
Method
  1. Make a soft dough with the pasta ingredients, and add a little water if its too dry. Pound and knead the dough down to release the gluten.
  2. Wrap in cling film and place in the fridge to rest for 30 minutes to an hour.
  3. Heat the olive oil in a thick bottomed pan, and add the garlic. 
  4. Cook for a minute and add the red chilies. Fry for another minute and take off the heat.
  5. Add the parsley, stir around and leave aside to infuse for at least 30 minutes.
  6. Take the dough out of the fridge, and knead down again. Split into two sections and roll out one on a floured surface. 
  7. Lightly flour the dough on both sides and roll through the pasta machine. Keep flouring both sides of the pasta sheet after each roll.
  8. Once the pasta sheet is rolled out to level 5 (around 0.5 cm), run through the vermicelli attachment. Toss the vermicelli strands lightly to separate them out and add some flour to keep them from sticking. Repeat with remaining dough.
  9. Heat a pan of salted water and once boiling, add the vermicelli strands. Shake lightly to separate out each strand and cook for 1 minute, until the vermicelli is just cooked.
  10. Drain, and while still warm, toss in the dressing. Add a tablespoon of the cooking liquor and toss around to make sure that the dressing evenly covers the vermicelli strands.
  11. Tuck in immediately with a little bread to mop up the dressing.


Saturday, August 31, 2013

Paella de Marisco


Paella, in all its forms and variants, is the perfect dish to cap a lazy weekend. Its a non-fussy dish that practically cooks itself and is a great way of finishing up leftover vegetables and meats. As a student I'd make a large batch of it at lunch on Sunday, then store and have it during the week. The rice typically used for paella is either calasparra or bomba, but any medium grain low starch rice can be used; I've used rose matta rice as it expands into these chewy and almost round rice grains that are textually differentiable from peas, prawns and squid. The only absolute necessities in a paella are chorizo (or any sausage cured with paprika) and paprika, and you can play around with all the other ingredients to find your own balance. I didn't have any chorizo around, so I used Hungarian sausage instead and upped the chili flakes.


Ingredients

  • 5-6 thin slices of chorizo, roughly chopped
  • 1 onion, chopped
  • 2 red peppers with one finely diced
  • 2 tomatoes, roughly chopped
  • 4 cloves of garlic, chopped
  • 2 cups medium grain rice (like rose matta or calasparra)
  • 6-7 strands of saffron
  • 1 tsp chili flakes
  • 1 tsp paprika
  • 2 tsp dried thyme
  • 1/2 cup peas
  • 4 cups chicken/fish stock
  • 1 cup dry white wine
  • 8-9 prawns, cleaned and deveined
  • 19-20 cooked clams
  • 6 squids, cleaned and cut into thick rings
  • 2 tbsp olive oil
  • salt to taste
  • Chopped parsley and lime to serve
Method
  1. Heat the stock on medium heat till it starts to boil. Switch it off and add the saffron. Mix it around so that the golden hue of the saffron diffuses through the stock. The saffron is only present in the recipe to add that light golden colour to the rice grains. It can easily replaced with 1 tsp turmeric for a punchier yellow.
  2. Roast the un-diced red pepper, either in an oven or over the stove. Once the skin blackens in parts on each side, take off and let it cool. Then peel the skin off and cut into longitudinal strips.
  3. Heat the oil in a flat-bottomed pan with a lid. Once smoking, add the chorizo and fry to a crisp.
  4. Add the garlic, onions and diced red pepper and fry it in the oil. Once the onions become translucent, add the tomatoes, thyme, peas, paprika and chili flakes and stir around. Cook on a high heat until the tomatoes lose their firmness and then add the rice.
  5. Stir the rice around to make sure that the oil coats each individual grain.
  6. Add the wine and cook the rice until the wine is completely absorbed.
  7. Then pour in half the stock, reduce the heat to medium high and cover with a lid. Once the stock's been poured in, avoid stirring the rice.
  8. It should take around 10-15 minutes for the stock to be absorbed by the rice. Once absorbed, add the prawns and the remaining stock. 
  9. Cook on a medium high heat and put the lid back on. Once most of the stock is absorbed, and only a thin film of it is left, add the squid rings and clams, and salt to taste.
  10. Put the lid back on and let it cook until the stock is completely absorbed.
  11. Take off the heat and let it rest for 5 minutes, covered. Garnish with parsley and the juice of the lime and serve up.

Sunday, August 25, 2013

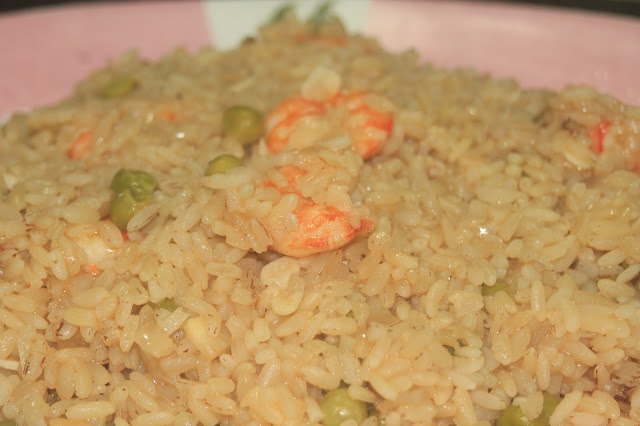
Prawn and Pea Risotto


Risotto is all about the rice. Its light seasonings and slow cooking pace are designed to pull as much flavour from the rice as is possible. So don't be snooty about the rice that you use, there's no absolute need to use arborio rice for it. Use any short grained rice that you like for your risotto. I'm not a fan of starchy arborio, and prefer the earthy taste of rose matta. Its not as starchy, and the risotto won't be as creamy, but it adds a nice sweetness to the risotto. You make it a little rich and creamy by finishing the risotto with some butter and a cup of cheese, but I left that out as I can see myself putting in any extra time in the gym for it.

I've made this risotto with prawn and chicken stock, but you can make a vegetarian version with mushroom and vegetable stock, and just keep the peas. I've also added some paprika for heat. For cooking the risotto, use a deep thick bottomed pan with a lid. 

Ingredients
  • 1 cup rose matta rice (or any short-grained rice)
  • 1/2 cup peas
  • 5-6 uncooked prawns, shelled and deveined
  • 1 small onion, chopped
  • 5 cloves garlic, chopped
  • 1 tsp paprika
  • 1 bay leaf
  • 1/2 cup white wine
  • 2 1/2 cup chicken stock
  • 1 tbsp butter
  • salt and pepper to taste
Method
  1. Heat the chicken stock until it starts to boil, and then take it off the heat and set aside covered. This is to keep the stock warm as you ladle it into the risotto.
  2. Melt the butter in the pan and add the onions, garlic, bay-leaf and paprika. Fry on high heat till the onions turn translucent.
  3. Add the rice and stir around to make sure that the butter coats each grain.
  4. Cook on a high heat and keep stirring the rice to prevent it from sticking. Cook until the rice turns opaque.
  5. Add the wine and stir it around to deglaze the pan. Then reduce the heat to a medium high, and cover the pan. Let it sit on the heat until the rice absorbs the wine.
  6. Add the peas and about 1/2 a cup of the chicken stock. Stir once, then cover and let is sit on the heat until the rice absorbs the liquid.
  7. Add another 1/2 cup and stir once, then leave to cook covered. Keep repeating this and test the rice after around 10 minutes to see if its close to cooking.
  8. Once you estimate that the rice is nearly cooked, add the prawns and one last cup of stock. Stir once and cook covered until the rice is just done and there is a little creamy liquid left in the pan. The prawns too should be bright red and glistening. The risotto is cooked when the rice is tender, but is just a little tough in the centre.
  9. Take off the heat, and let it cool for 5 minutes. This resting gives the starch released by the rice some time to meld into the creamy sauce.
  10. Serve up immediately. Try to finish the risotto right after cooking as it doesn't store well. Reheated risotto has this clammy feel and porridgy texture.

Saturday, August 24, 2013

Fresh Fettuccine with a Zucchini Marinara sauce


Fresh pasta has this tenderness and and unctuousness that store bought pasta can scarcely compare with. I bought a pasta machine last week and had to try it out this weekend. Fresh pasta needs a lot of "love", ergo a lot of pounding and stretching, to make as it uses hard summer wheat but needs the glutinous flexibility of winter wheat. So be prepared to exercise those dormant muscles in your hands and arms as they're in for quite a workout while making the dough. 

For the sauce, I used a simple marinara, with the addition of some zucchini and bacon for that little textual lift. For a vegetarian version you can omit the bacon entirely, and add some crisp onion as a garnish at the end for a little crispiness.

Ingredients

Fettuccine

  • 4 cups fine wheat semolina, or hard wheat flour
  • 5 eggs
  • 1 tsp salt
  • Extra plain flour for dusting
  • Vegetable oil for oiling
Marinara Sauce
  • 6 whole tomatoes
  • 1 medium onion, chopped
  • 5 cloves of garlic, chopped
  • 1 tsp dried oregano
  • 1 tsp dried thyme
  • 1 tsp dried basil
  • 1 tsp paprika
  • 1/2 cup white wine
  • 1 tbsp olive oil
  • 1 tsp pepper
  • salt to taste
  • 1/2 a zucchini, chopped into thick quarters
  • 3 rashers of back bacon, roughly chopped
Method

Fettuccine
  1. Mix the eggs, salt and semolina together and knead into a firm dough. You shouldn't need any extra water, but in case the dough is a little loose add a little plain flour to kelp bind it together
  2. Once the dough is made, place it on a floured workplace and oil your fingers. Then punch the dough down and stretch it out with the base of your palms. Roll it back and stretch it out again. Working this way with the dough will get the wheat germ to release its gluten.
  3. Keep working on the dough until its springy to touch; which should take around 10 minutes of kneading. Then wrap in cling-film and let it rest for at least 30 minutes.
  4. Once rested split into 8 sections, and take one while keeping the rest under cling film to prevent it from drying out.
  5. I used a pasta-machine, so roll it out until the pasta sheet is around 1 mm in thickness (setting 7). Then cut it out into fettuccine strips and boil in salted water. Keep the dough and fettuccine strips lightly floured to keep it from sticking. 
  6. The fettuccine when cut would appear to be bunched together, but they would separate out when boiling. Just lightly shake it just as you add it to the boiling water and it will separate out.
  7. Cook until its just cooked and just firm to touch, which should take around 2-3 minutes. Drain and lightly oil.
  8. Repeat with the remaining pieces of dough.
Marinara sauce
  1. Score the top of the tomatoes crosswise and boil until completely cooked. Remove and keep under cold water, then peel the skin off the tomatoes.
  2. Add the boiled and skinned tomatoes to a food processor along with the oregano, thyme and paprika. Grind until you get the desired texture, such as keeping it chunky or smoothening it out.
  3. Heat the olive oil in a pan and add the chopped garlic and onions.
  4. Fry until the onions turn translucent and add the zucchini. Fry and cook the zucchini and add the white wine.
  5. Stew on a high flame and add the ground tomato.
  6. Add the pepper, basil and some salt to taste and bring the sauce to a boil. Then lower the flame to medium and let it stew. I like my marinara sauce to be thick and thus I cook the sauce uncovered. If your cooking it uncovered, keep stirring it periodically to prevent it from burning. Once cooked remove from heat and keep covered.
  7. Fry the chopped bacon on high heat and in its own fat. Add the crisp bacon to the sauce and mix in in.
  8. Create a base of fettuccine and ladle the sauce over. Serve up and dig in.